
If you live with a health condition like anxiety, insomnia, autism, restless legs syndrome or sensory processing disorder, you’ve probably heard the hype about weighted blankets.
For those who aren’t in the know, a weighted blanket is essentially a blanket with weighted materials (like high-density plastic poly-pellets, glass beads or rice) sewn into it to distribute weight evenly over the person using it.
Though there isn’t much research to support the idea that weighted blankets can positively impact different health conditions, lots of folks swear by them.
While all of this is well and good, the reality is weighted blankets can be pricey. They typically retail anywhere from 120 to 300 dollars or more depending on where you buy it.
If you’re ballin’ on a budget, have no fear, we’ve got you covered. We wanted to create a comforting (and cheap) alternative to the weighted blanket — so we created a DIY weighted shoulder wrap you can make for under $10, (or under $25 if you want to add essential oils and don’t have any lying around at home).
It’s smaller than a weighted blanket, but it may provide you the comfort you need when you’re struggling. The best part? Depending on which materials you use, you can heat it up in the microwave for the experience of a warm “hug.” Below we’ll walk you through the process of making one yourself — complete with helpful pictures and GIFs to guide you through, step-by-step.
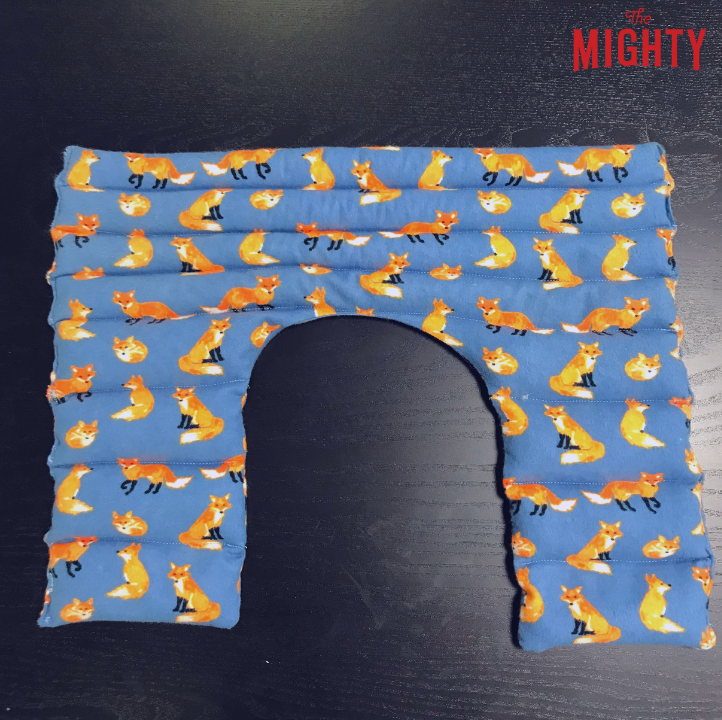
Here’s what it’ll look like when you’re all done:

To make the DIY weighted shoulder wrap, you’ll need basic knowledge of sewing, access to a sewing machine and a few other materials. Here’s what you’ll need for this easy project.
Materials
- Trader Joes Jasmine Rice – $2.99
- Gutermann Natural Cotton Thread – $4.99
- One Yard of Natural Fabric (We Used Snuggle Flannel) – $3.49
- (Optional) Young Living Lavender Vitality Essential Oil – $12.00
Editor’s Note: We chose these materials in order to make the shoulder wrap both weighted and heatable, which means it cannot be washed. You can use other materials such as poly-pellets so this product is washable, as well as synthetic fabrics and threads, but be aware that you will not be able to safely heat your wrap.
Step-by-Step Directions
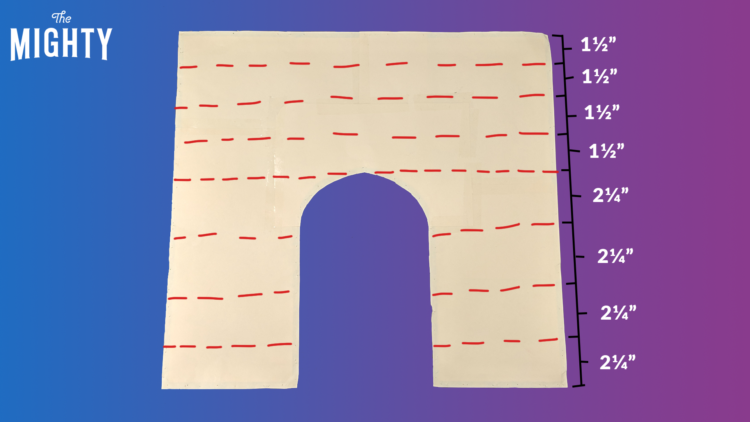
Step 1: Create a Sewing Pattern
Your first step is to create a sewing pattern. You can make the pattern out of actual sewing pattern paper, brown wrapping paper or even card stock. Your pattern should be 16 1/2 inches by 15 1/2 inches with a “U-shaped” cut out with a length of 8 3/4 inches. To see what this looks like, check out the image below.

Step 2: Trace 1/4-Inch Hemlines Along the Outer Border of Your Sewing Pattern
Use a ruler to measure and trace hemlines that are 1/4 inch from the outer border of your pattern.
Step 3: Pin Your Pattern to Your Fabric
Make sure your fabric and pattern are both completely flat once you do this.
Step 4: Cut Fabric Along the Pattern Lines
After pinning your pattern to the fabric, carefully cut the fabric on the outer edge of your pattern.
Step 5: Remove the Pins, Then Repeat Steps 3 and 4
Once the pins are all removed, take the rest of your fabric and repeat steps three and four to make the other side of your shoulder wrap. It’s better to pin and cut these sides separately rather than double up the fabric in one step so you can ensure your pattern is facing the correct direction when you sew it together!
Step 6: Pin Your Fabric Cutouts Back-to-Back
Take your two fabric cutouts and pin them back-to-back so the pattern faces inward.
Step 7: Sew 1/4 Inch Along the Highlighted Sections
Sew along the 1/4 inch hemlines you traced on the highlighted sections in the GIF below. The sewn parts should be the top of the weighted wrap, the “U-shaped” cutout and half of the left side.
Step 8: Turn Your Project Inside Out and Flatten
Once you turn your project inside out, you should see your desired pattern facing out.
Step 9: Pin Horizontal Sections on Your Project
These horizontal “pockets” are where the rice will go to make your shoulder wrap “weighted.” At the top, you can pin each section in 1 1/2 inch increments, and towards the bottom, you can pin in 2 1/4 inch increments. Please note you are just pinning these sections — do not cut.
Step 10: Sew Along Pinned Lines
Feel free to remove pins as you sew along your pinned lines.
Step 11 (Optional): Mix Essential Oil Into Your Bag of Rice
You can use as much or as little as you like — depends on how much aromatherapy you’d like!
Step 12: Fill Each Horizontal Section With Rice and Pin/Sew as You Go
You can use a funnel or folded plate (shown in the GIF below) to fill each section. As you fill it, pin and sew as you go — this will keep rice from falling out.
And there you have it, folks — your very own weighted shoulder wrap! If you try this project, let us know in the comments. We’d love to hear how you like it.
Check out the full video tutorial below:
For more “crafty” content from our Mighty community, check out the following stories:
Hi, I'm Juliette. I'm the former Mental Health Editor at The Mighty. I joined The Mighty because I believe storytelling is a powerful tool in raising awareness about mental health and trauma. I'm inspired every day by the brave vulnerability of our community. #MightyTogether
juliette-v